Everything about Waterproofing Auckland
Table of ContentsWaterproofing Auckland Things To Know Before You BuyThe Ultimate Guide To Waterproofing AucklandThe Waterproofing Auckland DiariesExcitement About Waterproofing AucklandExcitement About Waterproofing Auckland
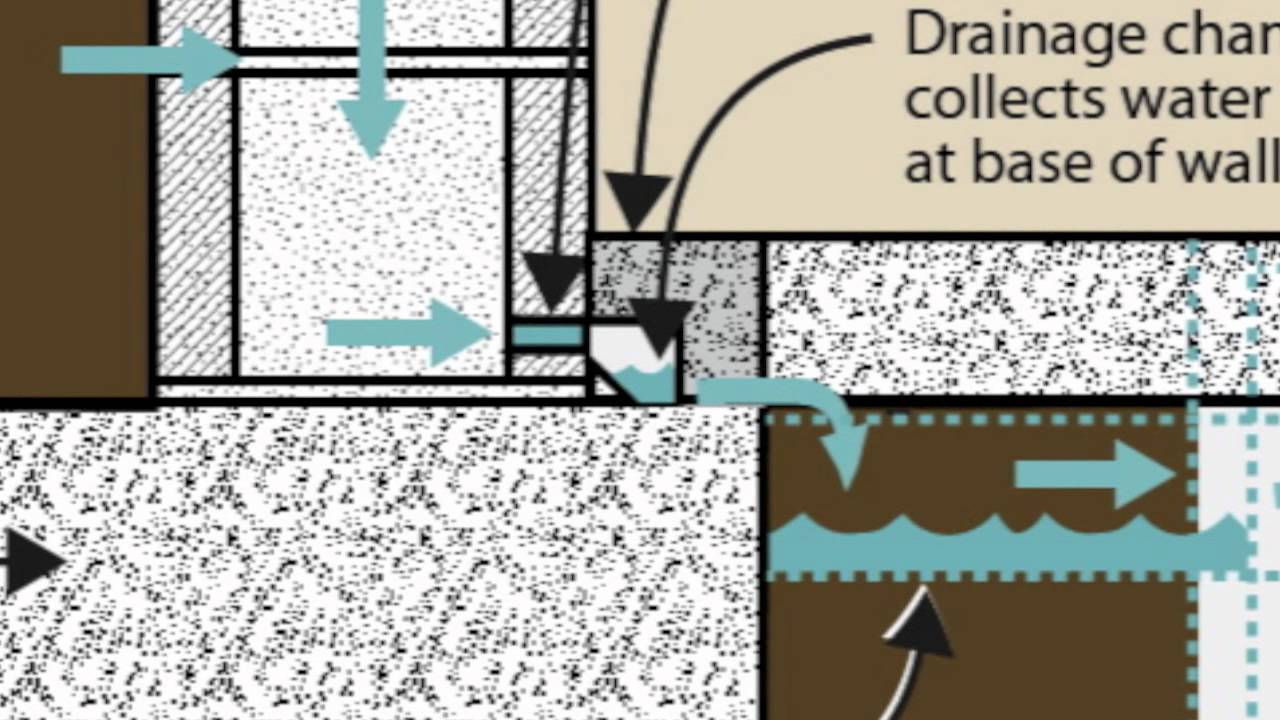
45m (18) in diameter, are stocked progressive slopes. The joints of these pipes are kept open. The collecting chambers are created at ideal intervals and at turning factors. The accumulating chambers are not glued from the inside or outdoors, to get water from the surroundings. The perforated pipes are then covered with loosened materials like chips and steel, to create a filter media.The below ground water discovers the means of least resistance via the filter media. The water is gathered in the perforated pipelines with the filter media.
The treatment for the underground water tank coincides as that of the basement, besides the complying with factors. A stipulation for a pump sump is made, as opposed to the seamless gutter plan. The overflow pipe is situated at the preferred level, to drain pipes out the excess water. Inspect this pipeline for its rigidity before the waterproofing job procedure.
Some Known Details About Waterproofing Auckland
If white or colored joints are required, then the grey concrete joints are raked, and also white cement or color concrete slurry is used with a little traveling over the surface for joints of a matching color. The surface area is once more cleansed with sawdust. to get rid of excess white or shade concrete adhering to the polished china mosaic surface.
Bonus material is reduced off with a putty blade as well as a smooth upright joint is developed. Considering that the sealant is extremely costly, utilize it.
The outermost surface area of the sealer should provide a slightly concave surface area in account. Remove the concealing tape as well as tidy the surface area with ideal solvents. For water-proofing of the horizontal expansion joint, arrangements should begin from the R.C.C. stage of the building. The following treatment ought to be observed. Upside down light beams are required to the location, for the expansion joint, side by side.
Socketing (pressure grouting)' is a treatment to grout the cement slurry by stress right into the permeable concrete member. Complying with a series of the work treatment.
The Only Guide to Waterproofing Auckland
Place 20mm (3/4) metal over the chiseled part, as a filter media. Deal With 25mm (1) G.I. outlet over the steel, utilizing abundant cement mortar around the socket and also metal. Permit 1 day for the mortar to resolve and also the limited dealing with of the socket. Wage grouting using a size G.I.
5 to 2. 0m. Grouting ought to be finished with concrete slurry of the needed thickness. For smooth circulation, add 1 bag of cement to 75 to 100 litres. If the waterproofing work procedure is refrained from doing appropriately, it can pose issues. Repair services and maintenance of waterproofing can prove very bothersome for the individual.
is where the optimum water is used. Usually, the parent slab of the W.C. device has an I.W.C. Frying pan as well as a concrete situation of size 0. 9m x 1. 2m x 0. 6m. This case is water-proofed after taking care of the required devices such as P-trap, C.I. piece, W.C. pan, etc system can suggest the various factors of leakages, as noted below. The joint between the C. 1/P. V.C. item and why not look here P trap. The joint between the (tee) of outer upright stack as well as P.V.C./ C.I. piece. The joint in between the P-trap and I.W.C. frying pan. The joint in between the flushing pipe and I.W.C frying pan. All these joints need to be sealed with the appropriate sealer, at the corresponding stages during the implementation of the job.
Load all the voids in the floor covering of W.C. with cement. Check the joint between the P-trap as well as L.W.C. pan from above, by placing a hand into the catch. Seal this joint with M-seal, if it is partly open. Inspect the joint in between the flushing pipeline as well as L.W.C. frying pan by damaging just one ceramic tile, fitted specifically over the joint.
10 Easy Facts About Waterproofing Auckland Explained
Open the "Tee' of the upright stack from the outdoors, with a ladder or zula as well as observe the joint of C.I. piece and Tee' with torchlight and also seal it effectively. If leakage still lingers, break open the hidden flushing G.I. pipe and also inspect if it is Home Page watertight.
If this does not quit the leakage, break open the total unit as well as check the joint at the P-trap and also C.I./ P.V.C. pipe. Do the brand-new waterproofing work treatment completely with utmost treatment. Generally, 90% of leaks stop, if we bring out the repair as mentioned above, in the very first four points.
like the container drainpipes, for their water rigidity. This can be checked by quiting the procedure of the wash hand container and keeping these lines entirely dry and operating them once more after 4-5 days. If the leakages dry and also start, the source is via these lines. Break open the lines and also situate the source as well as change the affected component.
Damage open the bathroom waterproofing job treatment and also re-do it carefully. A common and successful method for treating small leaks is to deal with the afflicted part with cement slurry.
How Waterproofing Auckland can Save You Time, Stress, and Money.
Check the damaged part of the terrace making use of a wood mallet and More Bonuses also inspect if it has peeled. Get rid of the loose portion with a carve as well as hammer. Re-do it thoroughly. If the leak is from the edges or from the parapet wall, after that fill up all the splits after damaging it open with cement.
Some chemicals are advised for combining with concrete, at the time of concreting. The typical approach of brickbat coba is still the most popular of water-proofing technique in India. Waterproofing substances are normally available in powder as well as liquid kind, as they serve the dual function of waterproofing job procedure and also heat shielding.
Guarantee that the socketing is done prior to the base layer work. Make sure that all the brickbats are well-soaked in water, prior to use.
Maintain an appropriate space in between the brickbats. Check the slope of the brickbat coat, in the direction of the catch. Ensure that the water-proofing compound is mixed in the mortar, for every single phase of job. The topcoat ought to be accomplished in one stroke, with no joints. Guarantee appropriate ending up near catches and spouts.